VR interactions#
How to attach your nodes in the VR hierarchy?#
Once you have configured that the hand of your user is moving with a tracker, you might want that a 3D object that you've created moves with the user's hand.
For example you might have added a tennis racket to your project and want it to be attached to the user's hand.
Attach to node#
Simply attach the "MVRAttachToNode" script
to the node that you want to insert in the VR hierarchy.
You can find this script in the "Scripts/Interactions" folder of the
MiddleVR package.
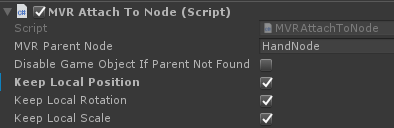
- MVR Parent Node : Name of the parent MiddleVR Node from the configuration. For example "HandNode", "HeadNode".
- Disable Game Object If Parent Not Found : Disables the whole Game Object if the MVR Node was not found.
- Keep Local Position/Rotation/Scale : In Unity by default when parenting an object to another, the local transform of an object is modified so that it keeps its world transform. This means the object is not moved when it changes its parent. If you want to keep the local transform, for example to specify an offset from the VRParent Node to the object, enable "Keep local Position/Rotation/Scale"
Wand interactions#
When you have correctly configured your Wand in MiddleVR, you can use standard interactions like:
- Navigation: navigate the VR hierarchy in the virtual world using the Wand orientation and joystick axis,
- VR First Person Controller: Control Unity First Person Controller with Wand axis/buttons.
- Action: trigger actions when a 3D node is selected by the wand and a button is pressed,
- Grabbing: grab 3D nodes to move them in the scene.
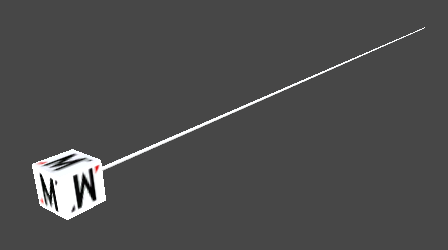
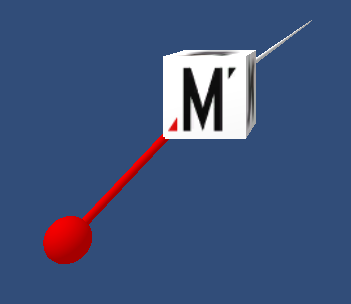
Here's the 3D representation of the wand:
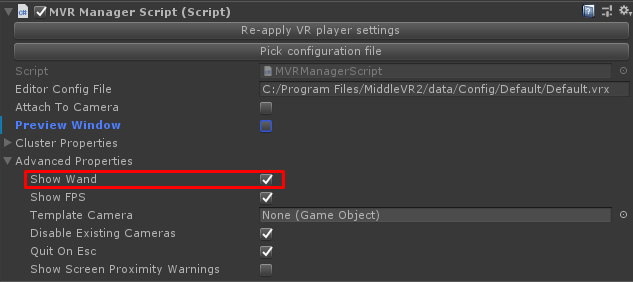
The first thing you have to do is enable the Show Wand option of the MVRManager:
The wand is visible and active by default.
The MVRWand node has several scripts attached to it that handle and configure interactions.
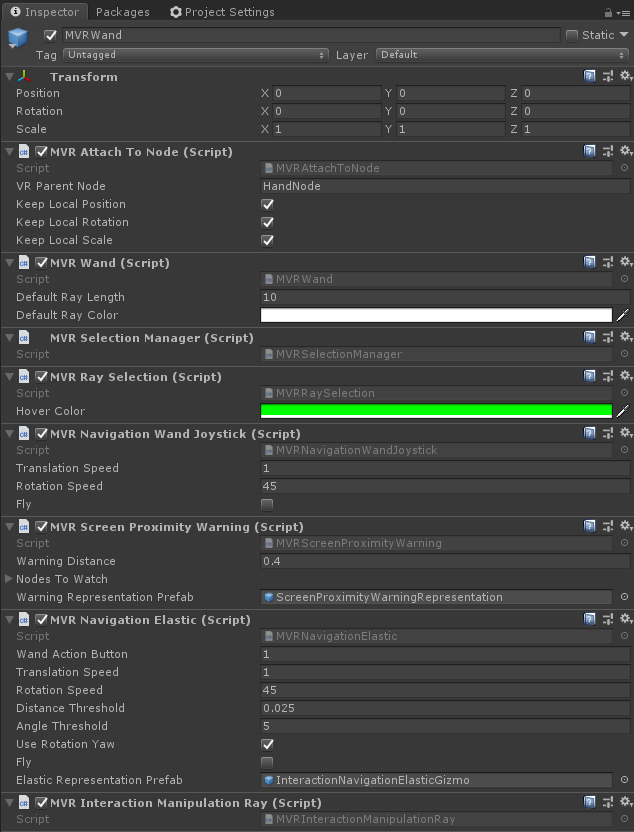
You can safely deactivate the scripts that you don't need.
Note that despite the fact that MiddleVR supports multiple wands, the 3D representation and the interactions will still only use the first wand from the configuration. The other wands signals are accessible through the device manager and you can use them to make your own interaction scripts.
Navigation#
The navigation is handled by one of the Navigation Interaction scripts attached to the MVRWand.
Some of these navigation methods have a "Fly" property to lock/unlock vertical translations. This parameter can be directly checked/unchecked on the interaction script before building.
Some navigations techniques need a navigation button to be used. By default, this button is the wand button 1. This way, in the MiddleVR configuration, you can map your chosen device button to the Wand button 1 to make it be the navigation button.
Joystick Navigation Method#
You can navigate using the axis of the Wand joystick. The navigation will move in the direction pointed by the hand. You can change this behaviour by editing the script. It will also rotate left or right if you move the horizontal axis of the Wand.
If you want to sidestep/straffe, point your hand to the right or to the left and press forward.
By default you will be able to fly in the scene. If you wand to stick to
the current height, uncheck the Fly option.
-
Translation Speed : Translation speed, in meters per second.
-
Rotation Speed : Rotation speed, in degrees per second.
-
Fly : Allow a free navigation (Fly) or keep the current height (Fly disabled).
Elastic Navigation Method#
You can navigate by pressing the navigation button of the Wand joystick and stretching the appearing elastic gizmo that binds the Wand to it's stretch start position. The navigation will move in the direction that the elastic gizmo is pointing.
The more the elastic is stretched, the faster the navigation is. The same concept applies to rotation: the rotation difference between now and the moment you pressed the navigation button will make you rotate more or less.
If you want to sidestep, press the navigation button and stretch the elastic to the right or to the left.
By default you will be able to fly in the scene. If you wand to stick to
the current height, uncheck the Fly option.
-
Translation Speed : Translation speed, in meters per second.
-
Rotation Speed : Rotation speed, in degrees per second.
-
Distance Threshold : The minimum elastic stretch distance to start moving.
-
Angle Threshold : The minimum rotation angle between the start and end orientations to make a rotation movement.
-
Use Translation X : Is translation along the X axis allowed?
-
Use Translation Y : Is translation along the Y axis allowed?
-
Use Translation Z : Is translation along the Z axis allowed?
-
Use Rotation Yaw : Is horizontal rotation allowed?
-
Fly : Allow a free navigation (Fly) or keep the current height (Fly disabled).
Screens Proximity Warning#
You can activate the parameter "Show Screen Proximity Warnings" in the MVRManager to make screens visually warn you when you get too close to them. This will activate the MVRInteractionScreenProximityWarning script that is attached to the "Wand" node. When it is enabled, MVRInteractionScreenProximityWarning watches if your head (by default) is too close to a screen. If yes, it makes a physical warning screen appear in the place of the virtual screen. This way, you are remembered of the real screen presence when you are just about to physically hit it.

-
Nodes To Watch : A list of the 3D nodes' names (declared in your configuration file) that will be used to check the distance from the screens. By default we only use the "HeadNode" to prevent the user's head to hit a screen.
-
Warning Distance : When the distance between the watched node and the screen is lower than "Warning Distance", the visual warning appears.
Manipulation#
Ray Manipulation Method#
The object you grabbed with the Hand Node is attached to the wand ray,
this way you can manipulate it as if it would be put on a spit.
Interactions#
The Wand can be used to select any 3D object in your scene. You can then notify this object that a button of the wand has been pressed. You can also grab this object to move it around in a different place.
To specify that an object can be interacted with, you just have to add
a MVRActor script in MiddleVR/Scripts/Interactions to it.
- Grabable : Can this object be grabbed?
Unity GUI#
See Tutorial Unity GUI.
Grabbing#
If you want an object to be grabable, simply add a MVRActor
script to it and enable the Grabable option. When the object is
selected and the main Wand button is pressed, the object will be grabbed by
the Wand, and released when the button is released.
Action#
You can find a useful sample script demonstrating the following concepts in:
MiddleVR/Scripts/Samples/MVRActionSample.
React to wand buttons#
When the object is selected, it can be notified that a button is pressed on the wand. This is useful if you want to perform an action when a particular node is selected.
If you want a node to be able to be notified, you have to attach the
MVRActor scripts to it. This script will enable notifications on this
object.
Unity Messages#
When an object is selected and the main button of the Wand is pressed,
the Wand will send the OnMVRWandButtonPressed message to it. To react to this
message, the only thing you have to do is create a method called
OnMVRWandButtonPressed on any script attached to the object. This method will be
called every time the OnMVRWandButtonPressed message is sent.
    protected void OnMVRWandButtonPressed(MVRSelection iSelection)
    {
        Debug.Log(name + ": OnMVRWandButtonPressed.");
    }

    protected void OnMVRWandButtonReleased(MVRSelection iSelection)
    {
        Debug.Log(name + ": OnMVRWandButtonReleased.");
    }
To know which button was pressed or released, use on all buttons:
MVR.DeviceMgr.IsWandButtonPressed(iIndex);
For more information see Programming interactions
Unity Events#
You can also use the new powerful UnityEvents.
First you have to create a new method:
public void MyWandButtonReaction(int iButton, bool iPressed)
    {
        if (iButton == 0 && iPressed == true)
        {
            Debug.Log("Button 0 pressed!");
        }
    }
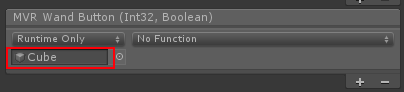
Then you have to go in the Unity Inspector on your MVRActor script,
locate the MVR Wand Button (Int32, Boolean) parameter group:
![]()
Click the + on the lower right. You must then specify which object will receive the event (currently set to None). The simplest way is to drag and drop a game object from the inspector:
Finally you must select the method that we wrote earlier:
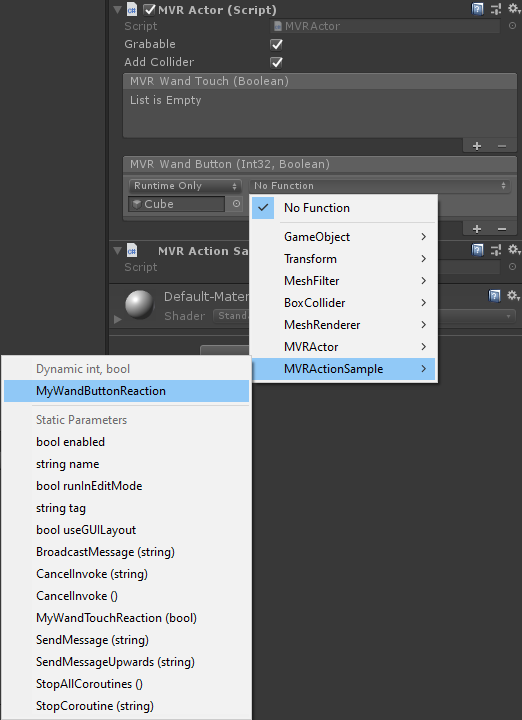
Now when you click on an object with the wand button 0 it will print "Button 0 pressed!".
React to wand touch#
Unity Messages#
When an object with a MVRActor is touched by the wand, it will receive a message
OnMVRWandEnter. In one of your scripts, simply handle the message:
    protected void OnMVRWandEnter(MVRSelection iSelection)
    {
        Debug.Log(name + ": OnMVRWandEnter.");
    }
The object will also receive the OnMVRWandHover every frame as long as
the wand touches the object.
Finally the object will receive the OnMVRWandExit when the wand stops
touching it.
    protected void OnMVRWandHover(MVRSelection iSelection)
    {
        //Debug.Log(name + ": OnMVRWandHover.");
    }

    protected void OnMVRWandExit(MVRSelection iSelection)
    {
        Debug.Log(name + ": OnMVRWandExit.");
    }
Unity Events#
You can use the same method as above to use the Unity Events by first creating a method such as:
    public void MyWandTouchReaction(bool iTouched)
    {
        if (iTouched)
        {
            Debug.Log("Started being touched by wand.");
        }
        else
        {
            Debug.Log("Stopped being touched by wand.");
        }
    }
And assigning it to the MVR Wand Touch (Boolean) Unity Event.
First Person Controller#
Unity's First Person Controller is a handy way of having a nice navigation. You can control this First Person Controller using the Wand axis and buttons.
First you have to import the MiddleVR_FPS package. You can find it in your
MiddleVR/data installation folder.
This will import a new script in your project: MiddleVR_FirstPersonController\VRNavigationController.
Drag this script on your First Person Controller.
You can specify which node to use for direction. By default, it's the HandNode.
Note: If you want the MiddleVR hierarchy to follow the First Person Controller, you must set the VR Root Node parameter of the MVRManager to a node that belongs the First Person Controller hierarchy.
Beware: The First Person Controller object's center is not on the ground, it is located 0.5m above. This means that if you set the VR Root Node to the First Person Controller directly, the VR hierarchy will be 0.5m too high. One solution is to create a child node of the First Person Controller that is simply offset by -0.5 on the Y axis and set the VR System Center Node to this offset object.
Improving the portability of your application#
Being able to use your application on your VR system is a good thing, but it would be even better if you could use it on all the other VR systems!
Your application is said to be portable when it can
Here are a few guidelines.
Rely on 3D nodes instead of trackers#
- Trackers don’t necessarily have the same name or orientation/position offset from one platform to the other.
- 3D nodes semantically represent the actual user instead of devices. They can also be offset from the tracker. If both configurations are using the HeadNode to represent the physical position/orientation of the Cyclops for example, you can use this node instead.
- You could even want to prototype on a computer without trackers.
Read more about accessing 3D nodes in the "Programming interactions".
Unity XR (beta)#
Unity XR is Unity's support of eXtended reality device like VR HMDs and AR devices.
Both Unity XR and MiddleVR will modify cameras, project parameters and use input devices.
You might want to create a project that supports both Unity XR and MiddleVR.
Editor#
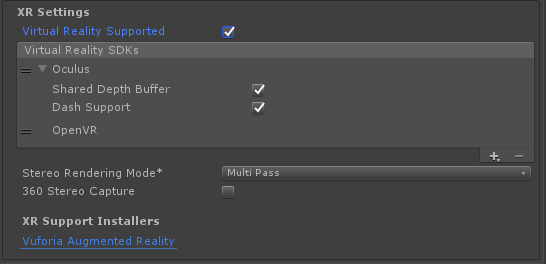
In Unity Editor, MiddleVR will be disabled as soon as "Virtual Reality Supported" is enabled in the player settings. If this option is disabled, MiddleVR will be re-enabled
This allows you to go from Unity XR to MiddleVR easily and vice versa.
Runtime#
At runtime, MiddleVR will be disabled if Unity XR is enabled in the project
and if it is not passed a configuration on the command line
(with --config <path_to_vrx>).
If MiddleVR detects the --config argument, it will disable Unity XR.
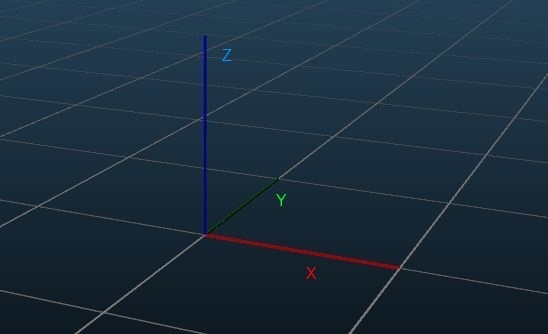
Unity coordinate system#
At its core, MiddleVR uses a right-handed coordinate system, where X is pointing to the right, Y is pointing away from the user towards the screen and Z pointing up:
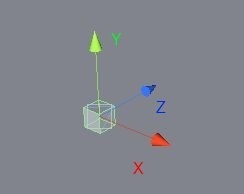
Unity's coordinate system is left-handed, with X pointing to the right, Y pointing up, and Z pointing away from the user, towards the screen:
When updating Unity's nodes and cameras, MiddleVR will automatically convert the 3D information from one coordinate system to the other.
But when you read the information of a MiddleVR node or of a 3D tracker directly from MiddleVR from a Unity script, it will be in MiddleVR's coordinate system. You then have to convert this 3D information into Unity's coordinate system. MiddleVR provides methods to do exactly that. See section "Input devices".
Programming interactions#
Introduction#
In this section we will cover the basics of programming interactions from within a Unity C# script.
MiddleVR handles all aspects of your VR app:
- access to the state and events of all devices,
- cameras, viewports, stereoscopy.
For example, how to react when the user presses a button on a joystick? Or a certain key on a keyboard?
Creating an interaction script#
First create a script and attach it to an active object: go into the
Assets menu, then Create > C Sharp script.
Drag and drop the script to an active object.
Double-click on the script to edit it, and add:
using MiddleVR.Unity;.
using UnityEngine;
using MiddleVR.Unity;

public class Example : MonoBehaviour
{
    void Start()
    {
    }

    void Update()
    {
    }
}
Input devices#
MiddleVR has an object that manages all the devices: the device manager.
You can query the device manager for the keyboard and mouse states:
if (MVR.DeviceMgr != null)
{
    // Testing mouse button
    if (MVR.DeviceMgr.IsMouseButtonPressed(0))
    {
        MVRTools.Log("Mouse Button pressed!");
        MVRTools.Log("VRMouseX: " + MVR.DeviceMgr.GetMouseAxisValue(0));
    }
    // Testing keyboard key
    if (MVR.DeviceMgr.IsKeyPressed(MVR.VRK_SPACE))
    {
        MVRTools.Log("Space!");
    }
}
Note: The Unity package of MiddleVR contains this sample script: MiddleVR/Scripts/Samples/MVRAPISample.
The device manager holds the reference to all declared devices. If you want to get access to trackers' data, or the state a joystick, you will first have to ask a reference of the corresponding object to the device manager:
if (MVR.DeviceMgr != null)
{
    // Testing mouse button
    if (MVR.DeviceMgr.IsMouseButtonPressed(0))
    {
        MVRTools.Log("Mouse Button pressed!");
        MVRTools.Log("VRMouseX: " + MVR.DeviceMgr.GetMouseAxisValue(0));
    }

    // Testing keyboard key
    if (MVR.DeviceMgr.IsKeyPressed(MVR.VRK_SPACE))
    {
        MVRTools.Log("Space!");
    }
}

vrTracker tracker = null;
vrJoystick    joy = null;
vrAxis       axis = null;
vrButtons buttons = null;

// Getting a reference to different device types
if (MVR.DeviceMgr != null)
{
    tracker = MVR.DeviceMgr.GetTracker("VRPNTracker0.Tracker0");
    joy     = MVR.DeviceMgr.GetJoystickByIndex(0);
    axis    = MVR.DeviceMgr.GetAxis("VRPNAxis0.Axis");
    buttons = MVR.DeviceMgr.GetButtons("VRPNButtons0.Buttons");
}

// Getting tracker data
if (tracker != null)
{
    MVRTools.Log("TrackerX: " + tracker.GetPosition().x());
}

// Testing joystick button
if (joy != null && joy.IsButtonPressed(0))
{
    MVRTools.Log("Joystick!");
}

// Testing axis value
if (axis != null && axis.GetValue(0) > 0)
{
    MVRTools.Log("Axis Value: " + axis.GetValue(0));
}

// Testing button state
if (buttons != null)
{
    if (buttons.IsToggled(0))
    {
        MVRTools.Log("Button 0 pressed!");
    }
    if (buttons.IsToggled(0, false))
    {
        MVRTools.Log("Button 0 released!");
    }
}
Note: The Unity package of MiddleVR contains this sample script: MiddleVR/Scripts/Samples/MVRAPISample.
Accessing wand data#
It is very easy to access the axis values and buttons states of the Wand through the device manager:
if (MVR.DeviceMgr != null)
{
    // Getting wand horizontal axis
    float x = MVR.DeviceMgr.GetWandHorizontalAxisValue();
    // Getting wand vertical axis
    float y = MVR.DeviceMgr.GetWandVerticalAxisValue();

    // Getting state of primary wand button
    bool wandButtonPressed0 = MVR.DeviceMgr.IsWandButtonPressed(0);

    // Getting toggled state of primary wand button
    // bool wandButtonToggled0 = MVR.DeviceMgr.IsWandButtonToggled(0);

    if (wandButtonPressed0)
    {
        // If primary button is pressed, display wand horizontal axis value
        MVRTools.Log("WandButton 0 pressed! HAxis value: " + x + ", VAxis value: " + y + ".");
    }
}
Note: The Unity package of MiddleVR contains this sample script: MiddleVR/Scripts/Samples/MVRAPISample.
Note: It is possible to add multiple wands in a configuration. To access their inputs, you simply need to retrieve the wand you wish by calling:
vrWand myWand = MVR.DeviceMgr.GetWand("MyWandName");
The display manager#
The display manager (MVR.DisplayMgr) is responsible for 3D
nodes, cameras, viewports and display management:
// 3D nodes
vrNode3D      node  = null;
vrCamera     camera = null;
vrCameraStereo scam = null;
vrScreen     screen = null;
vrViewport       vp = null;

if (MVR.DisplayMgr != null)
{
    node   = MVR.DisplayMgr.GetNode("HeadNode");
    if (node != null) { MVRTools.Log("Found HeadNode"); }

    camera = MVR.DisplayMgr.GetCamera("Camera0");
    if (camera != null) { MVRTools.Log("Found Camera0"); }

    scam   = MVR.DisplayMgr.GetCameraStereo("CameraStereo0");
    if (scam != null) { MVRTools.Log("Found CameraStereo0"); }

    screen = MVR.DisplayMgr.GetScreen("Screen0");
    if (screen != null) { MVRTools.Log("Found Screen0"); }

    vp     = MVR.DisplayMgr.GetViewport("Viewport0");
    if (vp != null) { MVRTools.Log("Found Viewport0"); }
}
Note: The Unity package of MiddleVR contains this sample script: MiddleVR/Scripts/Samples/MVRInteractionTest.
Converting data from MiddleVR to Unity#
As explained in the Unity coordinate system section, MiddleVR and Unity use a different coordinate system. When you get a 3D coordinate (3D vector, quaternion, matrix) from a tracker or a 3D node of MiddleVR, you have to convert it before using it to Unity:
vrNode3D node = MVR.DisplayMgr.GetNode("HeadNode");

transform.position = MVRTools.ToUnity(node.GetPositionVirtualWorld());
transform.rotation = MVRTools.ToUnity(node.GetOrientationVirtualWorld());
Converting data from Unity3D to MiddleVR#
On the opposite way, when you get a 3D coordinate (3D vector, quaternion, matrix) from a Unity GameObject and want to set it on a MiddleVR node or tracker, you first need to convert it from Unity to MiddleVR coordinate system:
vrNode3D node = MVR.DisplayMgr.GetNode("HeadNode");

node.SetPositionVirtualWorld(MVRTools.FromUnity(transform.position));
node.SetOrientationVirtualWorld(MVRTools.FromUnity(transform.rotation));
Troubleshooting#
What to do if things don't work as expected? Check the online Knowledge Base.
Some useful MiddleVR sample scripts#
Shortcut to invert eyes at runtime#
By dropping the sample script MiddleVR/Scripts/Samples/MVRShortcutInvertEyes.cs
in your scene, you will be able to switch the left and right eyes when pressing Shift-I.
Shortcut to reload level at runtime#
By dropping the sample script MiddleVR/Scripts/Samples/MVRShortcutReload.cs
in your scene, you will be able to reload the current level when pressing Shift-R
and load the level 0 when pressing Control-Shift-R.