Multi-user collaboration with Unity Netcode#
MiddleVR Netcode#
This is a package that allows you to create multi-user applications using Unity Netcode.
It simplifies the creation of multi-user applications that need to work in a cluster environment. It provides:
-
A package to get started quickly
-
3D avatars so that users can see and interact with each other
-
Network synchronization script
-
Grab interaction compatibility
-
Ability to connect to a server without opening any firewall port using Unity Relay
-
Also compatible with UnityXR
![]()
Definitions#
-
Server: A standalone server that does not represent a user -
Client: A user -
Host: A client that is also a server -
Relay host: A host that is accessible through Unity Relay -
Relay client: A client that uses Unity Relay to connect to a Relay Host -
Join Code: a code used by Unity Relay, provided by the Relay host and that needs to be specified by the Relay client to be able to connect to the Relay host
Installation#
Packages#
You application needs to include the following packages:
-
MiddleVR Netcode is only supported for Unity 6+
-
Unity Netcode for GameObjects 2.1.1: See documentation
-
Unity Relay 1.1.1
-
Unity Transport: 2.4.0
-
TextMeshPro: For Avatar names display
-
MiddleVR
-
MiddleVR Netcode
Setup#
Ports#
Direct connection#
- The UDP port is determined by the
Network Portparameter on theMVRNetworkManager. Default:UDP 9997.
Relay (Optional)#
Typically Relay only uses outbound connections, so it should work with most networks.
On some highly restrictive networks the outbound connections might also be blocked.
In that case first try to enable WebSockets on the MVRNetworkManager. This should use TCP 80 and/or 443.
If that does not help, contact your system administrator.
-
UDP port 7778 (Outbound)is required to be allowed only on the server/host computer to find the best relay server. -
Relay is currently operating only on the
UDP 37000-37100 (Outbound)range.
More information on Relay:
Unity does not provide port information in its official documentation, so we relied on the following sources:
Relay Setup (Optional)#
You can easily create an application that connects to a local computer on the same network using its local IP address.
However if you wish to host a server and allow people to connect to it without opening any firewall port, increasing the security of your system, you can use a "Relay".
A Relay is an online service that creates a bridge between your server and the clients that want to connect to it.
To enable Relay you need to:
-
Create a project in the Unity dashboard
-
Link your dashboard project to a Unity Editor project
-
Enable the Relay service:
-
From the Unity Dashboard, select Multiplayer > Relay.
-
Select Set up Relay.
-
Continue to the Relay Setup guide embedded in the Unity Dashboard.
-
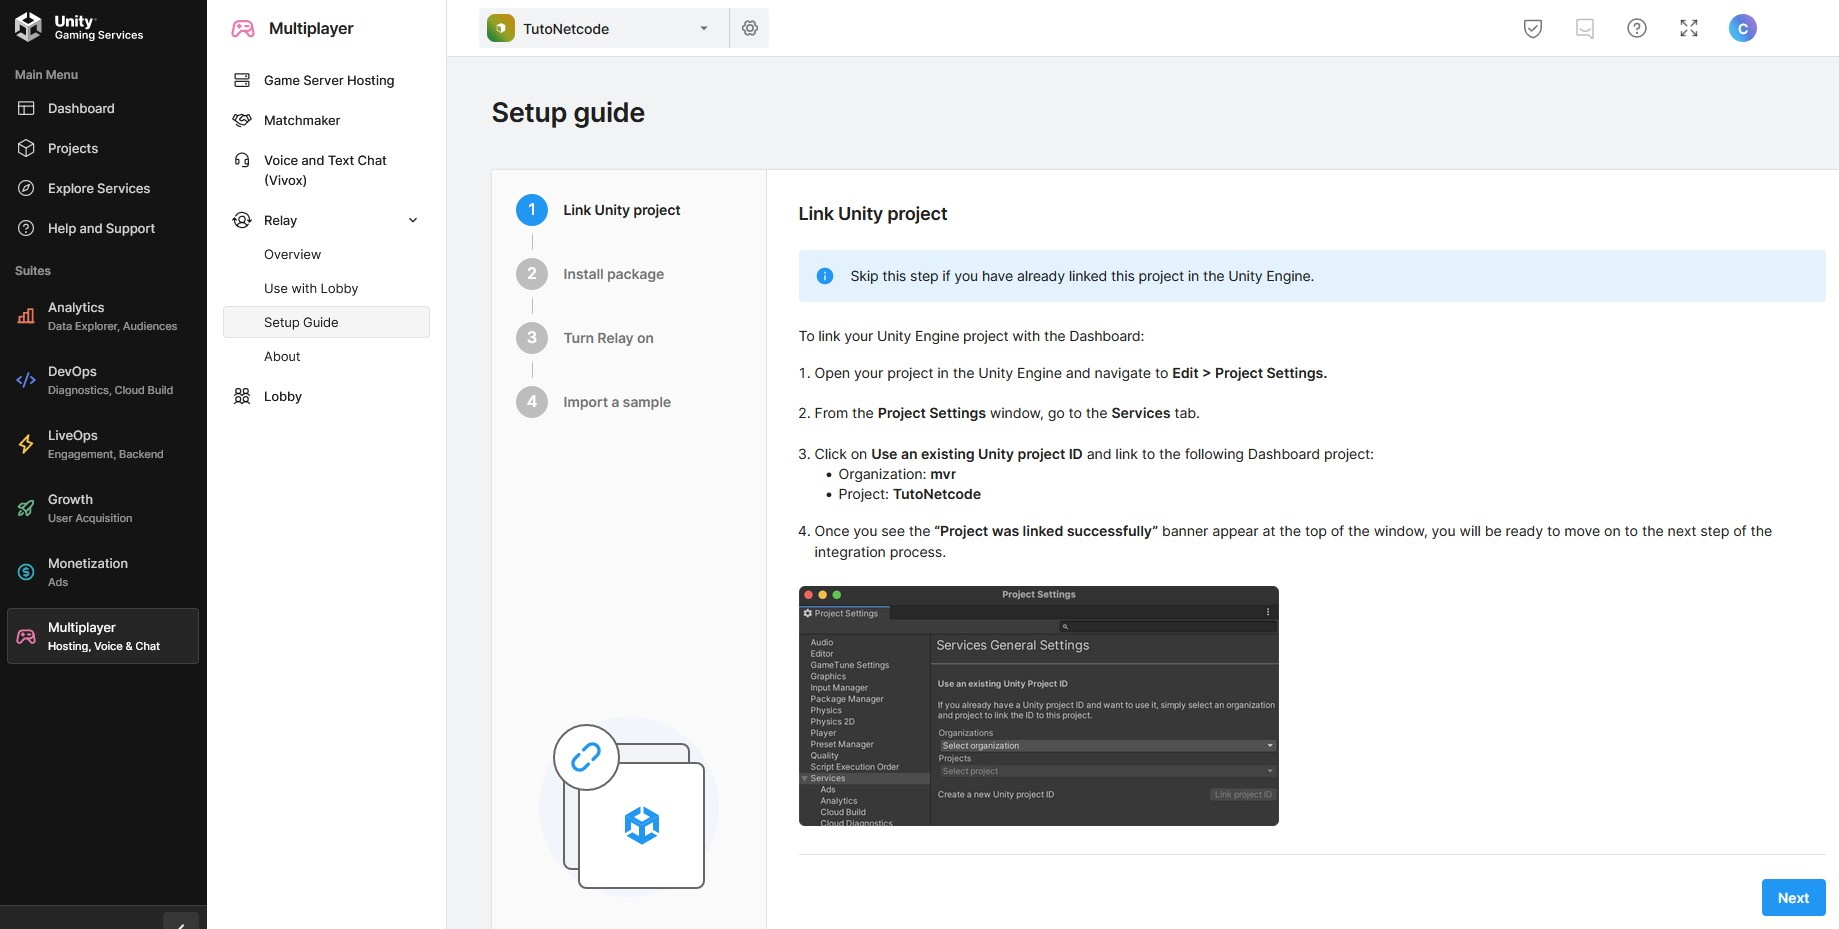
Note: You don't need to initialize Unity Services in your app code, this is done automatically by MiddleVR.
Adapting your application to Netcode#
Unity Netcode#
First make sure to read Unity Netcode's documentation.
Unity Setup#
-
MiddleVR Netcode is only supported for Unity 2022.3+
-
If you are not using Unity XR, make sure your MiddleVR configuration has at least a
HeadNodeand preferably also aHandNodeso your avatar can be correctly displayed. Otherwise see sectionCustom avatar. -
Import the
MVRNetworkManagerprefab fromPackages\MiddleVR Netcode\Runtime\
Moving objects#
To make sure that a moving object is correctly synchronized:
-
Add a
Network Objectto the root GameObject -
Add a script
MVRNetworkClientTransformfromPackages\MiddleVR Netcode\Runtime\to any of the GameObjects in the hierarchy that you want to synchronize both on the cluster and the multi-user network.
This script will:
-
Add the
MVRClusterObjectcomponent -
If the GameObject has a
MVRActorcomponent, will request ownership when Wand button 0 is pressed
If you want to synchronize a whole hierarchy, make sure to add a MVRNetworkClientTransform on all the moving nodes that you want to synchronize.
Only the root of the hierarchy needs to have a Network Object.
Unity XR Interaction Toolkit#
If you are using the Unity XR Interaction Toolkit, you can also use this script MVRNetworkedXRGrabInteractable.cs
(click to download) that replaces XRGrabInteractables.
Note: We provide this script as a separate download as it relies on both Unity XR and Unity Netcode packages. You can also find it in the demo_unity_xr project.
Make sure to:
-
Uncheck
Auto Object Parent SynconNetwork Object -
Uncheck
In Local SpaceonMVR Network Client Transform
It will:
-
Add the components
MVRNetworkClientTransform(and thusMVRClusterObject) -
Request ownership when the object is grabbed (
OnSelectEntered)
Avatar#
MiddleVR avatar#
![]()
MiddleVR Netcode comes with a basic avatar with one head, two hands, and a text displaying its user name. It can be used either with Unity XR / XR Rig or pure MiddleVR.
It is used as the default Player Prefab in the Network Manager.
The script MVRAvatar will do the following:
-
The head of your own local avatar will be hidden so as not to be displayed in front of your eyes. It will still be visible to all other users.
-
Pure MiddleVR:
-
If a
HeadNodeis found in the configuration, it will be used to move the head of the avatar, otherwise it will be hidden. -
If a
HandNodeis found in the configuration, it will be used to move the right hand of the avatar, otherwise it will be hidden. -
If a
LeftHandNodeis found in the configuration, it will be used to move the left hand of the avatar, otherwise it will be hidden.
-
-
If MiddleVR XR Input / XR Rig is used:
-
If a
Left ControllerorLeft Controller Stabilizedis found, it will be used to move the left hand, otherwise it will be hidden. -
If a
Right ControllerorRight Controller Stabilizedis found, it will be used to move the right hand, otherwise it will be hidden. -
The avatar hands will be hidden locally since the XR Rig will be showing the controllers. They will still be visible to all other users.
-
Custom avatar#
You can also assign your own avatar to the Player Prefab parameter of the Network Manager
but you will need to synchronize its movements yourself.
The best way is to add a Network Object on the root GameObject of the avatar
and add a MVRNetworkClientTransform to any node that moves.
RPCs#
Client Remote procedure calls must manually be replicated on all cluster nodes.
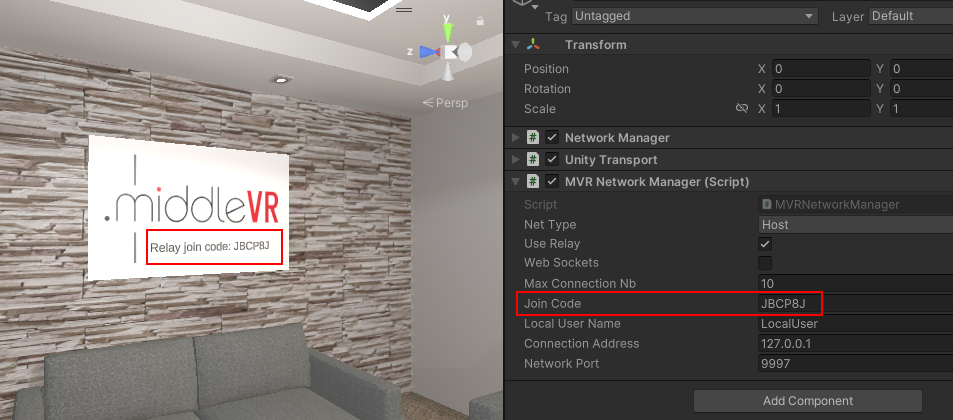
Displaying the join code#
The Relay Join Code will be available on the MVRNetworkManager of the Host/Server when the relay is ready.
The Join Code will be also be written in the MiddleVR logs of the Relay Host:
[+] *** Host - This is the join code that you must send to other users: JBCP8J
Finally you can use the script MVRDisplayRelayCode as an example to display the relay code in your scene.
Running a multiplayer app#
Parameters#
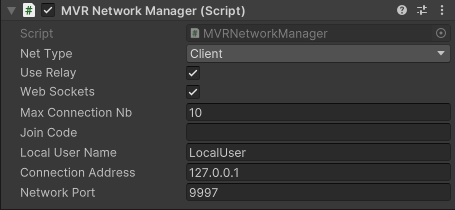
-
NetType: None, Server, Host, Client -
Use Relay: Should the clients connect directly or through the relay? -
WebSockets: Should the connection use WebSockets? This can help with connectivity issues in some cases. -
Max Connection Nb: Maximum number of connections allowed through the relay -
Join Code: On the host or server, the join code will be displayed here when the host or server is created. For a client, enter the join code you received. -
Local User Name: In the Unity Editor, this specifies the network username. This will be overridden by the command line argument, see below. -
Connection Address: Used when relay is disabled to connect a client to the specified server address. -
Network Port: Used when relay is disabled to specify the server port to use.
Build#
-
There is no additional requirement to build a MiddleVR Netcode app
-
If you are building for Android (for Meta Quest for example), you might need to change the following setting if you are not able to connect or create a server/host:
Player settings > Player > Other settings > Configuration > Internet Access > Required
Execution#
You can start the application with a command line or via MiddleVR Config.
MiddleVR Config#
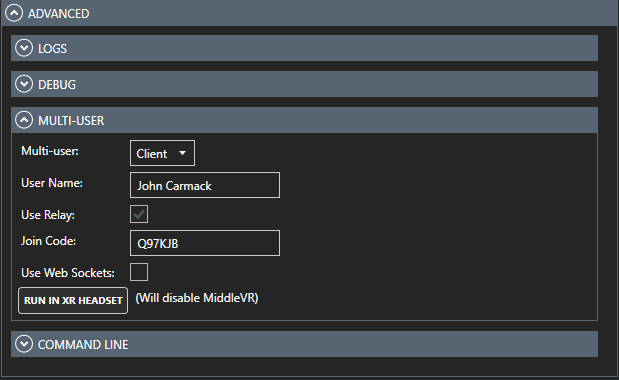
See MiddleVR Config multi-user.
Command line#
You can specify on the parameters of your app with the following command line arguments:
-
--mvr-net-start-server: Starts a local server -
--mvr-net-start-host: Starts a local host -
--mvr-net-connect 127.0.0.1: Connects a client to a local server or host -
--mvr-net-username Paul: Assigns the name Paul to the current host/client -
--mvr-net-start-server-relay: Starts a Relay server -
--mvr-net-start-host-relay: Starts a Relay host -
--mvr-net-connect-relay TRWB7P: Connects a Relay client to a Relay host using the provided Join Code -
--mvr-net-websocket: Force use of websockets -
--mvr-net-udp: Force use of UDP
Here are some useful command line examples:
-
Server:
"Z:\apps\netcode_office\demo_office.exe" --config "Z:\cfg\netcode\Server.vrx" --mvr-net-start-server --logfolder "Z:\logs\Server" -popupwindow -
Host:
"Z:\apps\netcode_office\demo_office.exe" --config "Z:\cfg\netcode\Razer1.vrx" --mvr-net-start-host --mvr-net-username Cb1 --logfolder "Z:\logs\Server" -popupwindow -
Client:
"Z:\apps\netcode_office\demo_office.exe" --config "Z:\cfg\netcode\Razer2.vrx" --mvr-net-connect 127.0.0.1 --mvr-net-username Cb2 --logfolder "Z:\logs\Client2" -popupwindow -
Host Relay:
"Z:\apps\netcode_office\demo_office.exe" --config "Z:\cfg\netcode\Razer1.vrx" --mvr-net-start-host-relay --mvr-net-username Cb1 --logfolder "Z:\logs\Server" -popupwindow -
Client Relay:
"Z:\apps\netcode_office\demo_office.exe" --config "Z:\cfg\netcode\Razer2.vrx" --mvr-net-connect-relay TRWB7P --mvr-net-username Cb2 --logfolder "Z:\logs\Client2" -popupwindow