Cluster#
Configuring the cluster#
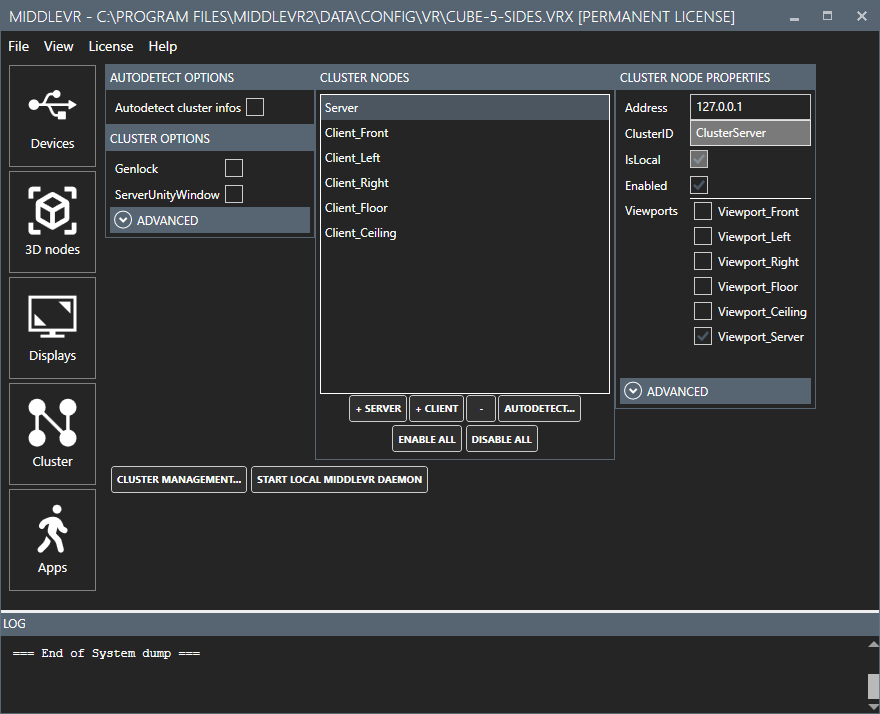
In the Cluster tab, you need to create one server (+Server) and as many clients (+Client) as needed.
For each cluster node you then must specify its address and viewports.
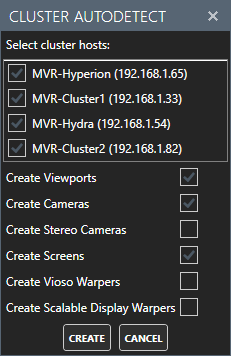
Autodetect#
- "Autodetect..." window to detect all the cluster nodes where the MiddleVR daemon is running. You can also choose to automatically create cameras, stereo cameras, screens, and warpers:
Autodetect options#
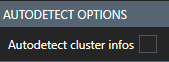
- Autodetect cluster infos : When adding a cluster node, MiddleVR will automatically try to retrieve information about this node. If the node is not accessible or MiddleVR Daemon is not running, this will freeze the interface for some time.
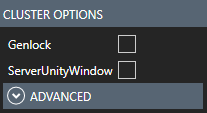
Cluster options#
-
Genlock : See section "Swaplock & Genlock".
-
Server Native Window : Creates a standard Unity window on the server. The window can be moved and its VSync is disabled This is useful if you want to be able to interact with a native Unity GUI with the mouse. This is also useful if the master uses a different refresh rate than the rest of the cluster. Often the master only has a mono display at 60hz while the other nodes have 120hz displays. In this case, disabling the VSync on the master gives better performances. This will also disable Genlock on the server.
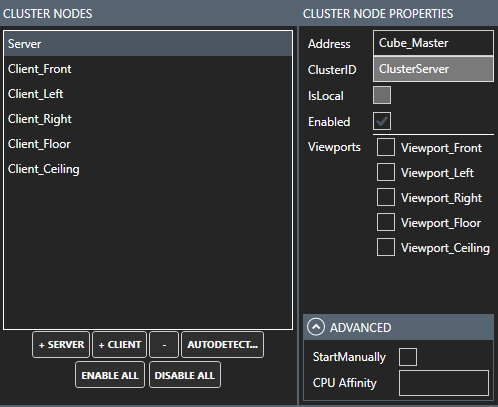
Cluster server#
Here's the configuration for the cluster server:
-
Address : Specify the hostname IP address of the cluster server. Should be reachable by all cluster clients. Note: If you specify "localhost" or "127.0.0.1", the clients will not be able to find the server, unless they all run on the same machine.
-
ClusterID : Cluster identification. Read-only on the server.
-
IsLocal : Is this node on the current computer ? Read-only.
-
Enabled : Disabling a node will temporarily remove it from the list of nodes. This impacts all the cluster commands such as running applications or connecting a network drive for example. This is mostly useful for debugging purposes.
-
Viewports : Specify the viewports used by the server.
-
Start Manually : Don't start the node automatically, start it manually. Useful with Editor Cluster Debugging
-
CPU Affinity : Specify the CPU cores to be used. For example with 4 cores, activating only the first two ones will be done by setting this value to 0,1. Note that MiddleVR relies on the number cores/CPUs as reported by Windows. The value does not always reflect the real number of physical CPUs because of technologies such as Intel Hyper-Threading, and because a CPU can be made up of several cores. Note that the activity of each CPU can be seen in the Windows task monitor. It is suggested that you try this feature only with multi-physical-CPUs (not simply-multi-cores CPUs) because Windows is already able to distribute very well threads on a same CPU equipped with several cores (you will just get bad performances). For example, try to use the 4 cores of a 2nd CPU but not the 4 cores of the 1st and measure performance differences.
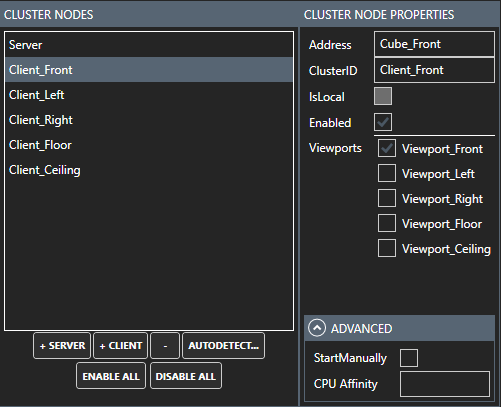
Cluster client#
Here's the configuration for all cluster clients:
-
Address : Specify the hostname or IP address of the cluster client.
-
ClusterID : You can specify a specific cluster identification name for readability or better debugging. Must be unique.
-
IsLocal : Is this node on the current computer ? Read-only.
-
Enabled : Disabling a node will temporarily remove it from the list of nodes. This impacts all the cluster commands such as running applications or connecting a network drive for example. This is mostly useful for debugging purposes.
-
Viewports : Specify the viewports used by the client.
-
Start Manually : Don't start the node automatically, start it manually. Useful with Editor Cluster Debugging
-
CPU Affinity : Specify the CPU affinity settings used by the client.
Cluster management#
- Start Local MiddleVR Daemon: Executes MiddleVR Daemon
GPU#
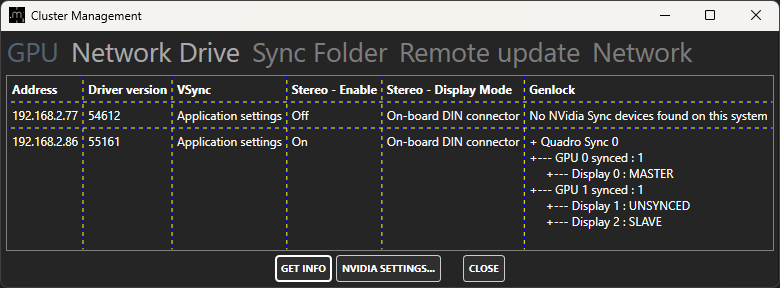
Displays GPU information from all cluster nodes. Useful to detect any issue with drivers version or configuration.
Press Get Info to fetch information on the cluster.
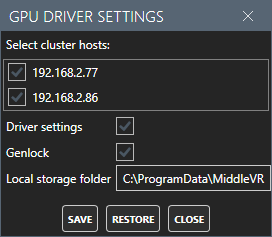
Press NVidia Settings... to save/restore NVidia drivers settings on the cluster:
-
Genlock: Save/load NVidia Quadro Sync parameters (GSync, Synchronize Displays)
-
Driver settings: Save/load NVidia driver settings: 3D settings (Stereoscopy, VSync,... ), Program settings. Note: This notably excludes Quadro Sync & Mosaic
-
Local storage folder: The settings will be stored on each cluster node. Non-existent folders will be created. You could for example store multiple variations or store backups of different dates.
Pressing Save will create files mvr_nvgenlock.txt and mvr_nvsettings.bin
in the Local storage folder.
It is currently not possible to add the name of the cluster node, so don't try
to save the settings to a shared network folder as they will all have the same name
and thus be overwritten.
Note: Make sure to save the settings after updating NVidia drivers
Note: Genlock is applied first
Also check the command line tool MVR_Tools which can save/load the same settings.
Network drive#
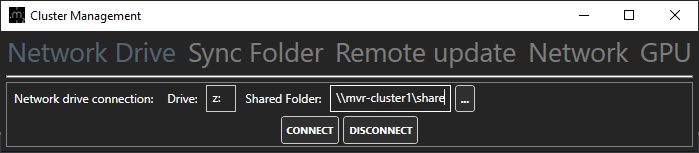
Connect the Shared Folder to the specified Drive on all enabled cluster nodes.
Useful for Cluster Setup
Sync folder#

Synchronize a folder with another on all enabled cluster nodes. The best usage is to synchronize the shared folder for faster startup times of apps. See Cluster Setup - Local copy
Remote update#
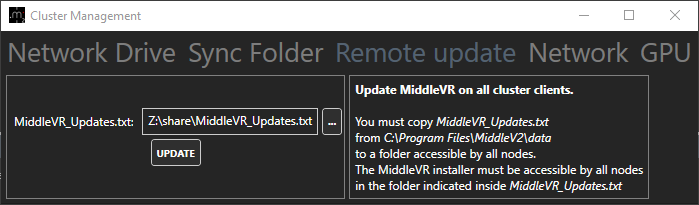
Update MiddleVR on all cluster clients. You must copy MiddleVR_Updates.txt
from C:\Program Files\MiddleV2\data to a folder accessible by all nodes.
The MiddleVR installer must be accessible by all nodes
in the folder indicated inside MiddleVR_Updates.txt.
Network#
Retrieve network information from cluster clients.
Ping#

Displays the ping for all cluster nodes. Useful to detect any abnormal ping.
Ping MiddleVR Daemon#
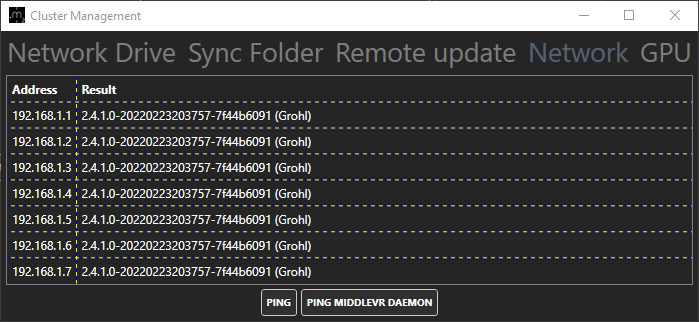
Displays the MiddleVR version on all cluster nodes. Useful to detect any outdated MiddleVR daemon.